
The type of oven in your accommodation may vary.
Warning: If the oven in your accommodation has a pull-down glass door, please do not place cold items on a hot door, or hot items on a cold door, as this may result in the glass shattering.
Please take particular care when igniting ovens and grills. Keep your children out of the kitchen. Take care when filling the electric kettle, ensure that you have disconnected it from the electrical supply before filling. Oven doors can be hot so exercise caution, particularly with younger children. Please do not leave items in the grills or oven unattended. Please note that your own electrical cooking equipment is not permitted in any type of accommodation.
Lighting the gas oven
Step 1: To ignite the oven burner fully open the oven door. If this operation is not performed you should not proceed to light the oven.
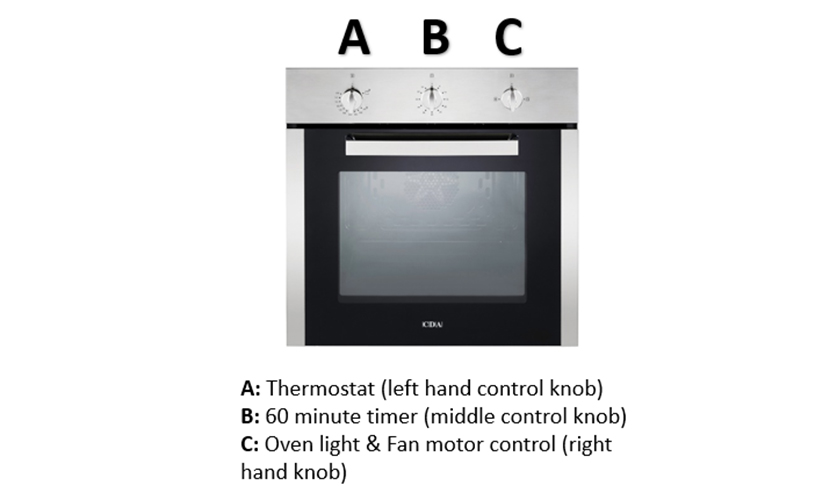
Step 2: Press the thermostat knob (A) thoroughly to start up the electric ignition and, keeping the knob under pressure turn it anti-clockwise to the maximum position. Never continue this operation for more than 15 seconds. If the burner has still not ignited, wait for about 1 minute prior to repeating the ignition.
Step 3: Wait about ten seconds after lighting the burner to release the knob (priming time of the thermocouple).
Step 4: Check that the burner has lit; if not, turn the knob clockwise back to (OFF) and repeat the procedure.
Step 5: Close the oven door slowly and adjust the thermostat knob on the desired setting. If the flame extinguishes for any reason, the safety valve will automatically shut off the gas supply to the burner. To re-light the burner, first turn the oven control knob to OFF position, wait for at least 1 minute and then repeat the lighting procedure.
Lighting the gas grill
Step 1: Fully open the oven door. If this operation is not performed you should not proceed to light the oven.
Step 2: Press the thermostat knob (A) thoroughly to start up the electric ignition and, keeping the knob under pressure turn it clockwise to position. Never continue this operation for more than 15 seconds. If the burner has still not ignited, wait for about 1 minute prior to repeating the ignition. In case of mains failure, to light the grill manually, put a flame to the right and left side of the burner then press and turn the thermostat knob (A).
Step 3: Wait about ten seconds after the burner lighting before releasing the knob (priming time of the thermocouple).
Step 4: Check that the burner has lit; if not, turn the knob anti-clockwise back to (OFF) and repeat the procedure.
Step 5: The oven door must always be kept half-open when the grill is in operation. If the flame extinguishes for any reason, the safety valve will automatically shut off the gas supply to the burner. To re-light the burner, first turn the grill control knob to OFF position, wait for at least 1 minute and then repeat the lighting procedure.
IMPORTANT NOTE: It is not possible to use the fan motor in combination with the gas grill; a safety device switches off the fan motor when the gas oven/grill control knob is turned on grill position. During and after use of the grill, certain parts will become very hot. Keep children away.
Download the user manual if you need further information and for full safety advice.
Electric oven controls and temperature knob
- To set the temperature, turn the temperature knob clockwise to the required temperature
- Once the oven has reached the required temperature, the temperature indicator lamp on the control panel will switch off
- The temperature indicator lamp will light up when the oven elements are in operation
Electric cooking function knob
To set the function, turn the cooking function knob to the required function. Each of the oven function. Each of the oven functions uses different elements within the oven to offer you the best choice of cooking every time. These are explained below.
Please note: The oven light will operate on all functions.
The control knobs are retractable. To lock it in or out, press the control knob in the off position.
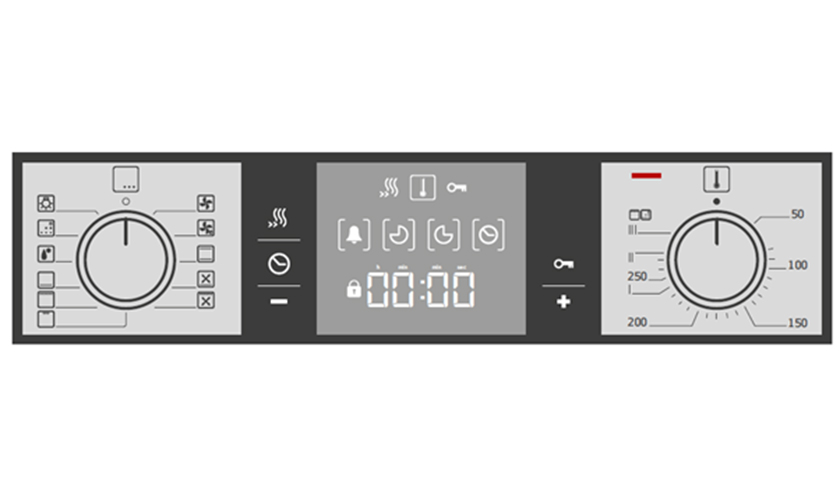
Buttons
The sensors are located under the individual buttons. They must not be pressed too firmly. Only touch the corresponding symbol.
Buttons and display
You can use the buttons to set various additional functions. On the display, you can read the values that you have set.
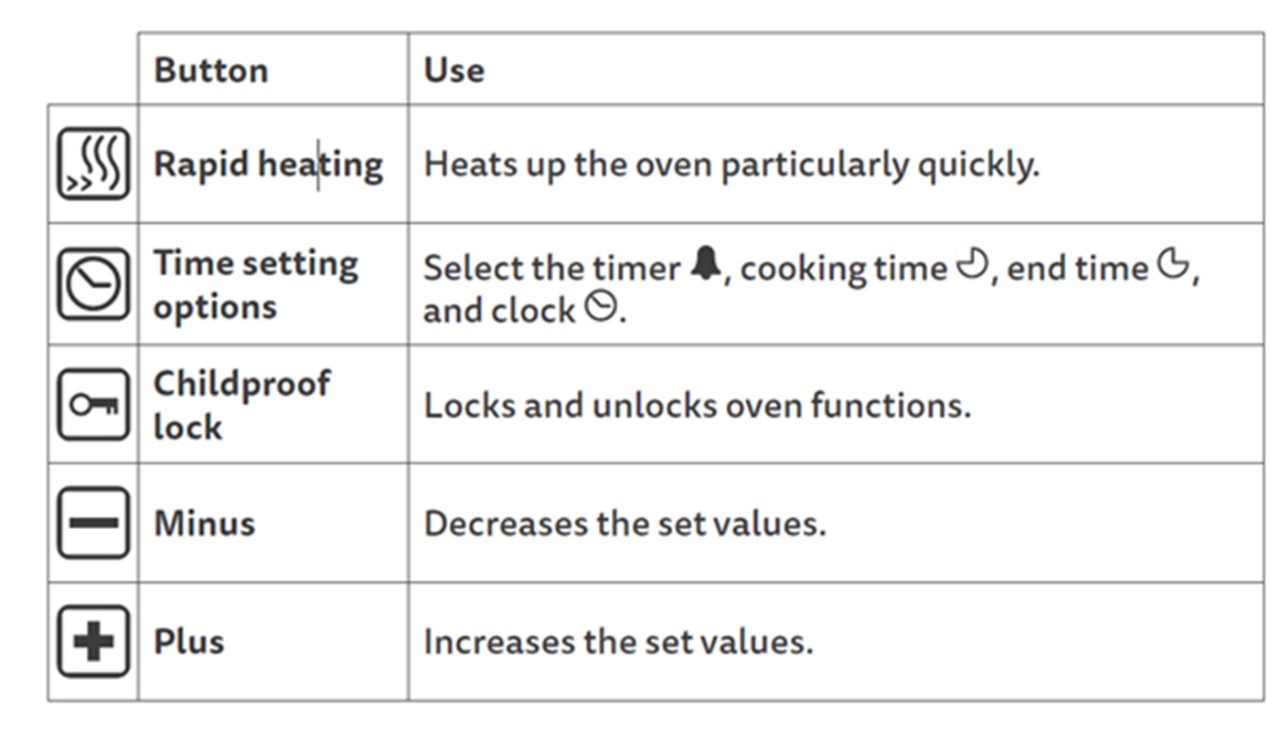
The time-setting option that is currently selected in the display is indicated in brackets [ ] around the corresponding symbol. Exception: for the clock, the clock symbol only lights up if the time is being changed.
Function selector
Use the function selector to set the type of heating.

Microwave instructions
- Touch a sensor on the control panel to enter that functions setting. The display will show the functions default time setting.
- Pressing the time sensor button will allow you to change the operating time for function. Use the arrows to adjust the time. Touch the OK sensor to comfirm the setting.
- Pressing the temperature sensor will allow you to change the power level of the microwave and temperature if applicable. Use the arrows to adjust the power. Touch OK to confirm the setting.
- Once you are happy with the settings, press the START/PAUSE sensor to begin cooking. The display will show the duration left on the cooking function and the Duration indicator and the Function active indicator will both be illuminated.
Oven instructions
- Touch a sensor on the control panel to enter the functions settings. The display will show the default temperature setting if a cooking function is selected. If a defrost function is selected the display will show the default time.
- Pressing the time sensor will allow you to set the minute minder. Use the arrows to adjust the time and touch the OK sensor to confirm the setting.
- Pressing the temperature sensor will allow you to change the temperature of the setting. Use the arrows to adjust the temperature and touch the OK sensor to confirm the setting.
- Once you are happy with the settings, press the START/PAUSE sensor to begin the function. For a cooking function, the display will show the current temperature and the Function active indicator will be illuminated. For a defrost function, the display will show the current time or the time left on the function, if applicable.