Welcome to the Woodland Premium and Grand Forest lodges appliance guide.
If you need further assistance, please contact Guest Services on 01623 827400
Please note: Some Woodland Premium and Grand Forest Lodges may feature alternative appliances. In such cases, please refer to the relevant appliance-specific instruction manuals
Dishwasher
Filling the detergent dispenser:
- Open the detergent compartment by pressing the button.
- Add the recommended amount of detergent to the main wash detergent compartment. The main detergent compartment has lines to allow for specific amounts of detergent. These are marked at either 15ml or 25ml, depending on how dirty the dishes are. If your dishes are in need of an intensive wash, then add 5ml of detergent into the pre-wash section of the compartment.
- Then close the detergent compartment by sliding the cover to the direction of the arrow
Buzzer sound on and off:
In default state, the buzzer sound is on.
- Open the door, switch on the appliance.
- Press the Program and Start buttons 3 seconds at the sametime, buzzer sound is turned off, and the inner lamp does not light when the door is opened.
- Press the Program and Start buttons 3 seconds at the same time again, buzzer sound is turned on.
Starting a wash program:
- Draw out the lower and upper basket, load the dishes and push them back. It is recommended to load the lower basket first, then the upper one.
- Pour in the detergent
- Press the Power button, press the Program button to select a desired "Wash program". Press the Start/ Pause button to start the program,close the door,with a little force to ensure the door is properly closed.
At the end of the wash program:
After the program has finished running, the digital display will show “00”, the buzzer will emit three short beeps, after that the digital display will show “End”. The machine will be switched off automatically after 3 minutes.
CAUTION: Open the door carefully. Hot steam may escape when the door is opened!
Indicators:
Operation (button):
Control panel:
Cooking Time & End Time:
You can set how long you want the oven to cook and when it should finish.
- Set the function knob and temperature knob to the setting at which you want the oven to operate
- Press the mode button until the cooking time icon appears.
- Set the cooking time using “+” or “–”.
- Press mode again to set the end time.
- When the end time is reached, the oven will turn off automatically and beep.
- Press any button to stop the alarm.
Oven Use:
- Turn the function knob to select the cooking mode (bake,grill, etc.).
- Turn the temperature knob to set the desired heat.
- The oven will start heating.
- When finished, turn all knobs back to the “0” or “off”position.
Oven settings:
Full grill - When the “combined grill” is active it enables grilling with the grill and with the top element switched on at the same time.
Seperate oven lighting - By setting the knob to this position, the lighting inside the oven is switched on.
Fan (Defrost) - At this function, the fan only works. You can cool the dish or the oven chamber or defrost food.
Circular heater fan - This function, allows the oven to be heated up in a forced way with the thermofan, which is in the central part of the oven chamber. Heating the oven up in this way permits everheat circulation around the dish that is in the oven.
Gas hob:
- To light the hob, push down the appropriate knob and turn anti-clockwise to the large flame symbol (Fig.11).
- Keep the knob depressed until the burner lights.
- Turn the knob to the required setting.
- In the event of the burner flames being accidentally extinguished, turn off the burner immediately and do not attempt to reignite for at least 1 minute.
Select the right burner:
Use an appropriately sized pan with a flat bottom for each burner (see the table below and Fig.12). When the contents of the pan start to boil, turn the knob down to reduced rate position. Always put a lid on the pan.
Please note: do not use pots or pans that overlap the boundaries of the hob
Integrated microwave and grill:
Microwave Cooking
- Press "Microwave" the LED will display "800 ", and press " +" and " - " to choose the power you want. Press “START/+30sec.” to confirm.
- Then press " + " and " - " to set the cooking time from 0:05to 95:00. Press“ START/+30sec.” to start cooking.
Grill or Combi. Cooking
- Press "Grill " once, the LED will display "G“.
- Press " + " and " - " to set the cooking time, until the ovens displays “10:00”
- Press “ START/+30sec. ” to start cooking.
Combi. Cooking
- Press “Combi” once , the screen will display "C-1”, press“Combi” twice, the screen will display “C-2”
- Press " + " and " - " to set the cooking time, until the oven displays “10:00”.
- Press“START/+30sec.” to start cooking.
Quick Start
- In waiting state, Press "START/+30sec. " to start cooking with 100% power, each added press will increase 30 seconds cooking time up to 95 minutes.
- In microwave, grill, combi. cooking or time defrost state,each press of " START/+30sec. " can increase 30 seconds of cooking time.
- In waiting state, set cooking time with 100% microwavepower, then press " START/+30sec. " to start cooking.
Defrost by weight
- Press "Defrost" once, and the oven will display "dEF1".
- Select the weight of food from 100 to 2000g.
- Press " START/+30sec. " to start defrosting.
Defrost By Time
- Press “Defrost” twice, and the oven will display "dEF2”.
- Press " + " and " - " to set the defrost time.
- Press " START/+30sec. " to start defrosting.
Menu
- Press once, the Led will display "P1", then press “Menu" tochoose, and “P1” to “P8” will display, which means cake ,pizza, soup, meat, pasta, vegetable, potato and reheat.
- Press “ START/+30sec. ” to confirm.
- Then press " + " and " - " to choose the default weight as the menu chart.
- Press " START/+30sec. " to start cooking.
Extractor fan - Woodland Premium lodges:
Using your extractor fan:
For best performance, you should switch on the extractor15 minutes before starting to cook and leave it to run for approximately 15 minutes after the end of cooking.
Control Panel
A – Power off button
B – Speed level buttons
C – Light button
To switch the extractor light on or off press button C.
To switch on the extractor or change the motor speed at anytime when the extractor is running press the relevant speed button (B) for the first, second or third speed as required.
To switch the extractor off press button A.
Extractor fan - Grand Forest lodges:
Using your Extractor fan:
For best performance, you should switch on the extractor 15 minutes before starting to cook and leave it to run for approximately 15 minutes after the end of cooking.
Control Panel
A – Power off button
B – Speed level buttons
C – Light button
To switch the extractor light on or off
- Press button C.
To switch on the extractor or change the motor speed at any time when the extractor is running
- Press the relevant speed button (B) for the first, second or third speed as required.
To switch the extractor off
- Press button A.
Wine cooler:
Buttons
- Power - To switch the appliance on/off (press and hold this button for approximately 5 seconds)
- Light -Used to switch the internal light on/off
- “+” -Used to raise the temperature in 1ºC increments
- “-” -Used to lower the temperature in 1ºC increments
Operating your wine cabinet
Please use the cabinet within ambient temperatures between 16-32ºC, if the ambient temperature is higher or lower than this, it will cause the temperature to fluctuate in the cabinet, possibly preventing it from reaching 4-20ºC.
To change the temperature
- Press the "+" or "-" buttons until the required temperature is shown on the display. The preset temperature is 12°C.
Recommended storage temperatures
- For storing ALL TYPES OF WINES 12˚C to 14˚C R
Recommended drinking temperatures
- Champagne NV, Sparkling 6˚C
- Champagne Vintage 10˚C
- Dry White Semillon
- Sauvignon Blanc 8˚C
- Dry White Gewürztraminer
- Riesling 10˚C
- Dry White Chardonnay 10˚C
- Vintage Chardonnay 14˚C
- Sweet White Sauternes Monbazillac
- Late Harvest ice wine 10˚C
- Sweet whites vintage Sauternes 14˚C
- Beaujolais 13˚C
- Red Pinot Noir 16˚C
- Vintage Pinot Noir red 18˚C
- Red Cabernet, Merlot, French, Australian, New Zealand, Chilean,Argentinean, Italian, Spanish, Californian 18˚C
- Red Grenache, Syrah 16˚C
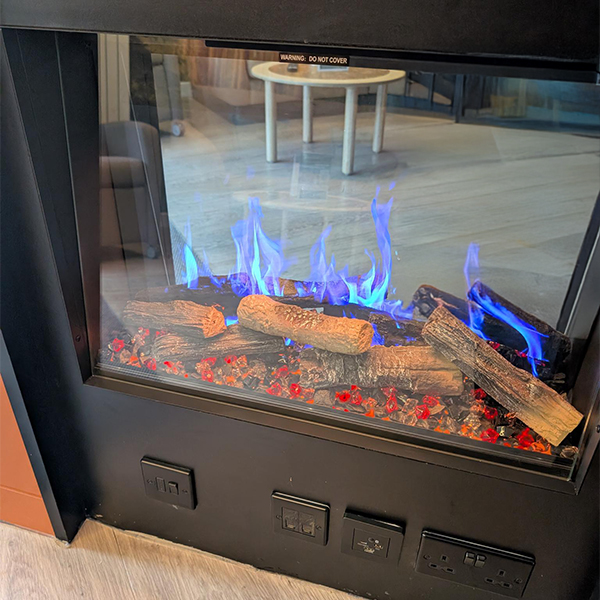
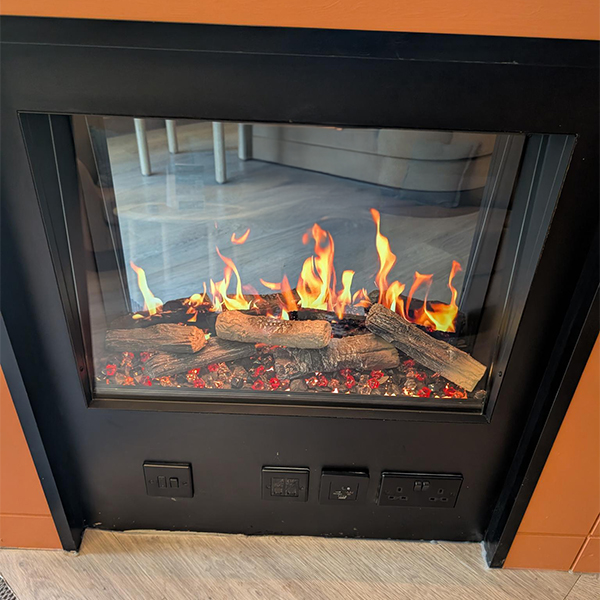
Electric fireplace:
Power button
This button will turn the appliance on and off.
Volume button
Six different levels.
Flame colours button
Press the flame colour button to select five different flame colours: 1 - Normal | 2 - Red | 3 - Yellow | 4 - Green | 5 - Blue.
Flame picture button
Press the flame picture button to select four different flame pictures.
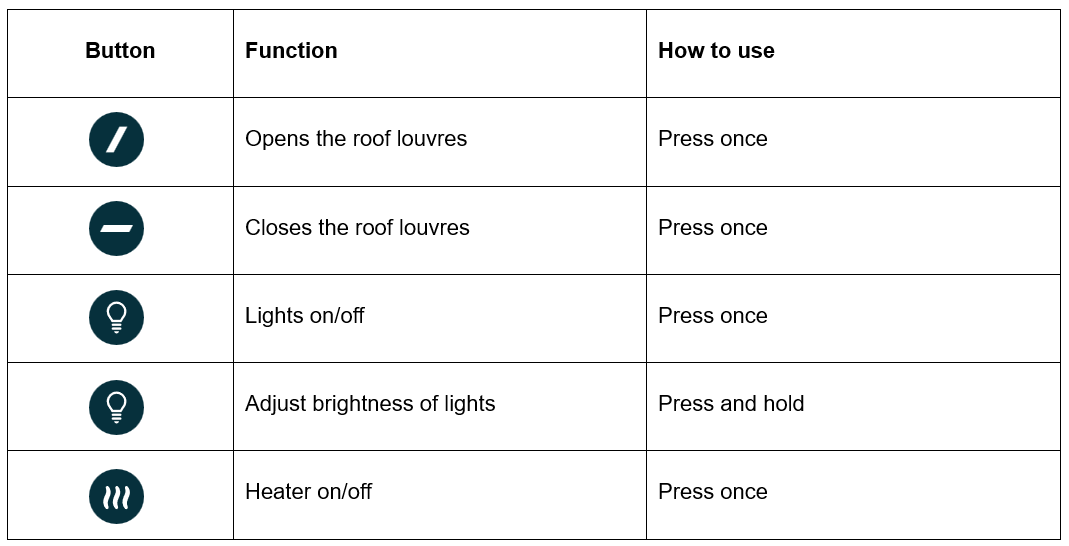
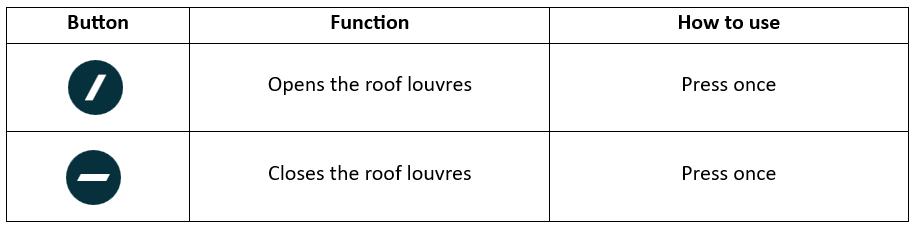
Opening the Louvres
- Press the Open Louvres button.
- The louvres will open automatically and stop when fully open.
- Press the same button again at any time to stop part-way.
Closing the Louvres
- Press the Close Louvres button.
- The louvres will close automatically and stop when fully closed.
- Press the same button again at any time to stop part-way.
Lights
Switching On / Off
- Press the Lights button once.
Adjusting brightness
- With the lights on: press and hold the light bulb button to dim/brighten.
- Release to stop at the desired brightness.
- To reverse direction (dim ↔ brighten): release, then press and hold again.
Heater
Switching On / Off
- Press the Heater button once to switch on.
- Press again to switch off.
Heater Safety Timer
- The heater automatically switches off after 15 minutes.
- To switch it back on, press the Heater button again.
Automatic Safety Features
Wind Sensor
- If the roof is open and you press Close Louvres during high wind, the controller will emit a double beep and the roof will not close this reduces wind load on the pergola.
Rain Sensor
- If the roof is closed and you press Open Louvres during wet conditions, the controller will emit a double beep and the roof will not open.
- This helps protect guests and outdoor furniture.
Wind + Rain
- If conditions are both windy and wet, the wind sensor overrides the rain sensor and the louvres will remain open.
General Safety Guidance
- Do not interfere with, disable, or modify sensors or electrical components.
- Do not hang items from the pergola (e.g. heaters, plants, decorations).
- Children must not operate the controls unsupervised.
Woodland Premium Lodge (Morvelle Pergola Operating Instructions)
Opening the Louvres
- Press the Open Louvres button.
- The louvres will open automatically and stop when fully open.
- Press the same button again at any time to stop part-way.
Closing the Louvres
- Press the Close Louvres button.
- The louvres will close automatically and stop when fully closed.
- Press the same button again at any time to stop part-way.
Automatic Safety Features
Wind Sensor
- During high wind, if the roof is open and you press Close Louvres, the controller will emit a double beep, and the roof will not close.
- This is designed to reduce wind load on the pergola.
Rain Sensor
- If the roof is closed and you press Open Louvres during wet conditions, the controller will emit a double beep and the roof will not open.
- This is designed to protect guests and outdoor furniture.
Sensor Priority
- If conditions are both windy and wet, the wind sensor overrides the rain sensor, and the louvres will remain open.
General Safety Guidance
- Do not interfere with, disable, or modify sensors or electrical components.
- Do not hang items from the pergola (e.g. heaters, plants, decorations).
- Children must not operate the controls unsupervised.